Any web developer who has been in the industry for a number of years can tell you the pains of creating rounded corners on websites. In the past and before the days of CSS, we designed our page layouts in tables and nested tables. Each corner was saved as a graphic and placed inside a table data field. For rounded corners in tabs, this was painful and required a lot of extra mark-up and empty table data fields to create the tabbed effect. I, and probably many others, became an expert at creating image corners with the minimal number of pixels and colours at this time.
After browsers started to use CSS, developers still needed to save the corners as images. Instead of tables, we used DIVs to hold our corner images. We still needed to include extra mark-up for this, but it was better than using tables for design.
These days, many developers are using CSS3 to create borders without the need to save their rounded corners as images. Rounded corners can be achieved using CSS without the need for images in all browsers except for any version of Internet Explorer below IE9. Although you do find some websites supporting IE6, this is far less common now, and there are other websites that simply do not support IE7 (or provide the user with the chance to upgrade). Although this solution does not work in the IE8 browser (and older versions), many tend to feel a graceful degradation is acceptable.
The border radius is easily set in CSS. Developers will need to include three variations of this property so that the rounded corners are properly set in generic browsers, Mozilla, or Webkit. The user can use the following three lines to set the border.
border-radius
-moz border-radius
-webkit border-radius
The above three lines can have one value, which will set the borders on all four sides, or it can take two values or four values. (This is similar to other CSS properties, such as padding and margin, where each side can have its own value.) If placing in two values, the values pertain to the top left and bottom right. If placing in four values, the values are in the following order: top-left, top-right, bottom-right, and bottom-left.
To target specific corners only, developers can use another property to target the specific corner. For example, if the developer wants to only change the top right corner, they can use the following:
border-top-right-radius
-moz-border-radius-topright
-webkit-border-top-right-radius
The same can be done for the other three corners. Yes, I agree that the consistency of the terminology between the different properties (Mozilla, Webkit, and CSS3) is a little confusing.
To achieve the borders below, I've provided a demonstration of how the properties should be used:
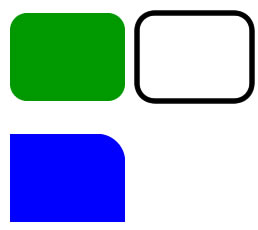
Green box:
#green {
border-radius:10px;
-moz border-radius:10px;
-webkit border-radius:10px;
background-color:green;
}
Black and White box:
#black-white {
border-radius:10px;
-moz border-radius:10px;
-webkit border-radius:10px;
border:5px solid black;
}
Blue box:
#blue {
border-top-right-radius:10px;
-moz-border-radius-topright:10px;
-webkit-border-top-right-radius:10px;
background-color:blue;
}
Developers can experiment with the border radius property by visiting: http://border-radius.com/
On this website, developers can enter the radius of each corner and see the output produced. (Note that the CSS provided by this website is not efficient in certain instances as it sets each corner separately, but it's a good guide.)
In addition to changing the borders, the developer can also specify the border radius so that the 'box' appears elliptical. To do this, the developer will also use a slash (/) between the values. The first value is the horizontal radius, and the second value is the vertical radius.
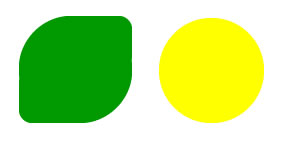
Green:
#green {
border-radius:40px 5px 40px;
background-color:green;
}
Yellow:
#yellow {
border-radius:50%;
background-yellow;
}
After reading this, you can get started creating rounded elements. Just remember that CSS3 will only work in certain browsers, and some older browsers do not support them.

Leave a comment