A little over a year ago, I posted about creating dynamic dialogs in CQ5 (
Using JSON to Populate CQ5 CMS Dialogs); this was a method I used in CQ5 4.0. In CQ5 5.0, it is much easier to do this. Here's an up-to-date tutorial that makes adding dynamic dialogs in CQ5 with JSON much easier. In this tutorial, I will explain how to make a dyamic selection (drop-down menu) and a dynamic checkbox group.
Creating the Component and its Dialog
The first step is to create the component with the dialog.xml file for the component. Create the component in the 'apps/' directory in the usual way, and create the dialog.xml file. In this file, make sure that you specify a 'selection' xtype. You will also need to include the following:
- options: This should point to the output of the JSON file. (In this tutorial, we will be creating our JSON using Java Server Pages, but you could simply create a static JSON file instead.
- optionsRoot: This defines the JSON data root.
- optionsTextField: This defines the text label for an option in the select box.
- optionsValueField: This defines the value for a selected option in the drop-down.
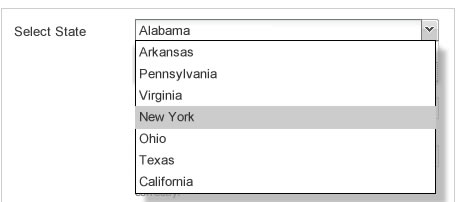
I've included an example of this selection xtype below. This drop-down will display a list of US States.
<items jcr:primaryType="cq:WidgetCollection">
<states
jcr:primaryType="cq:Widget"
fieldLabel="Select US State:"
name="./state"
type="select"
options="$PATH.states.json"
optionsRoot = 'states'
optionsTextField = 'label'
optionsValueField = 'id'
xtype="selection"/>
</items>
In the example above, we point our 'options' variable at the current path to the node in the JCR. The variable $PATH will give us this value dynamically. The JSON node should be accessible via the following:
http://localhost:4502/cf#/content/PATH-TO-PAGE/NAME-OF-COMPONENT.states.json
You can get the above path from looking at CRXDE; simply click onto the component in the 'apps' directory and view the path to the file.
We then create our dynamic file (which will output the JSON) in the same directory. (This file is referenced in the dialog above, and it will dynamically add the results of the JSON.) Our file structure will look like the following:
- states
- .content.xml
- dialog.xml
- states.json.jsp
- states.jsp
Creating the dynamic JSON
The dynamic JSON file should be saved as states.json.jsp as it uss Java Server Pages to render. At the top of the page, be sure to add the contentType 'application/json' so that it knows to render the output as JSON. Then, include your link to the Java tag. Print out the items by looping through using the JSTL core library, as demonstrated below:
<%@ page contentType="application/json" %>
<%@ page import="java.util.*" %>
<%@ include file="/libs/foundation/global.jsp" %>
<%@ taglib prefix="mylocation" uri="http://myapp.mysite.com/locations" %>
<%@ taglib prefix="c" uri="http://java.sun.com/jsp/jstl/core" %>
<mylocation:states currentPage="${currentPage}" />
{"states":[
<c:forEach var="item" items="${states}" varStatus="loop">
{ "id": "${item.name}", "label": "${item.name}"} ${not loop.last ? ',' : ''}
</c:forEach>
]}
Add your Java Tag Descriptor
In the above example for the JSON file, we referenced our own tag library, known as "mylocation". This will need to be added to the tag library descriptor (TLD) file. Simply locate this in your Java package and add the descriptor. In the above example, we are passing the current page (currentPage). Remember that the prefix described in the JSON file needs to be the same as the 'name' in the TLD file.
<?xml version="1.0" encoding="UTF-8"?>
<taglib xmlns="http://java.sun.com/xml/ns/j2ee" xmlns:xsi="http://www.w3.org/2001/XMLSchema-instance"
xsi:schemaLocation="http://java.sun.com/xml/ns/j2ee http://java.sun.com/xml/ns/j2ee/web-jsptaglibrary_2_0.xsd" version="2.0">
<tag>
<name>myloction</name>
<tag-class>com.path.to.file.LOCATIONS</tag-class>
<body-content>empty</body-content>
<attribute>
<name>currentPage</name>
<required>true</required>
<rtexprvalue>true</rtexprvalue>
<type>com.day.cq.wcm.api.Page</type>
</attribute>
</tag>
</taglib>
Add your Java Tag
After the tag descriptor has been created, add the Java file in the same location as defined in the tag descriptor. You will add your logic to this class, and you will pass back (to the JSP page) the value to render the states. It is likely that you will need to also create a Java model to describe this data (for states). For example, you should probably create a model for the states and use getters and setters to set up your data for each state. (You possibly want to associate the state name, abbreviation, and other data about a state for this.)
In the tag, you should add your getters and setters for the data passed into the tag. As we are passing in the currentPage, we need to add a getter and setter for this. To do this, we want to add the following to our Java Tag file:
At the top of the file, we will add the variable:
private Page currentPage;
In the Java Tag file, we simply add our getter and setter methods, as below:
public Page getCurrentPage() {
return currentPage;
}
public void setCurrentPage(Page currentPage) {
this.currentPage = currentPage;
}
When we have completed the logic to retrieve our data, we need to pass the data back to the JSP page. In the following method, we use pageContext to pass the name of the variable (which we use to get the object in the JSP), and the name of the object. For example, the states object is the second parameter, and it would be a type StateModel, as discussed.
pageContext.setAttribute("states", states);
Completed
Once you have followed the steps above, your dialog should print out dynamic data. You may need to debug this by viewing the JSON output as provided by accessing the JSON link detailed above. And, you should use JSONLint to ensure that your JSON is valid JSON mark-up.
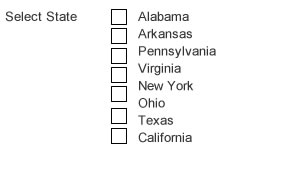
Dynamic Checboxes and Radio Buttons
Once you have completed the above, making a dynamic radio button or checkbox button group is a piece of cake. You can use the same code as above, but there is only one change that needs to be made here. This change needs to be made in the dialog.xml file. In the 'type' field, add 'checkbox' (instead of 'select'). You're all set to go!
Problems and Issues
This method was slightly different to my older implementation, but this is much easier. I spent over a day trying to locate an issue, however, as I could not get my JSON to load. I assumed that it was not being rendered correctly, and I was not expecting the results. It turned out that it seemed to be cacheing the JSON. I know that JSON can cache, and Google Chrome is notorious for cache issues, even when you have cleared the cache and forced refresh.
Another problem was environment-related. For some reason, two instances of CQ5 were running, and the environment (localhost) was confused! The old JSON was being rendered, despite making obvious changes, and it wasn't clear why CQ5 was hanging on to the old file. I spent ages going over (and then back over) my JSON and the method I was using only to discover that it was an environment issue with two CQ5 instances running in the background.
Of course, check the obvious issues first. Make sure that your paths are correct. And, perhaps start with dummy JSON data just to ensure that the JSON is being dynamically loaded into your dialog. That way, you can isolate any issues that may be related to Java errors. Also, don't forget to use JSONLint to validate your JSON mark-up.
Enjoy!
I had fun making this, despite annoyances with the environment. I hope you do too!


Leave a comment